Hadoop集群(第9期)_MapReduce初级案例(3)
5、多表关联
多表关联和单表关联类似,它也是通过对原始数据进行一定的处理,从其中挖掘出关心的信息。下面进入这个实例。
5.1 实例描述
输入是两个文件,一个代表工厂表,包含工厂名列和地址编号列;另一个代表地址表,包含地址名列和地址编号列。要求从输入数据中找出工厂名和地址名的对应关系,输出”工厂名——地址名“表。
样例输入如下所示。
1)factory:
factoryname addressed
Beijing Red Star 1
Shenzhen Thunder 3
Guangzhou Honda 2
Beijing Rising 1
Guangzhou Development Bank 2
Tencent 3
Back of Beijing 1
2)address:
addressID addressname
1 Beijing
2 Guangzhou
3 Shenzhen
4 Xian
样例输出如下所示。
factoryname addressname
Back of Beijing Beijing
Beijing Red Star Beijing
Beijing Rising Beijing
Guangzhou Development Bank Guangzhou
Guangzhou Honda Guangzhou
Shenzhen Thunder Shenzhen
Tencent Shenzhen
5.2 设计思路
多表关联和单表关联相似,都类似于数据库中的自然连接。相比单表关联,多表关联的左右表和连接列更加清楚。所以可以采用和单表关联的相同的处理方式,map识别出输入的行属于哪个表之后,对其进行分割,将连接的列值保存在key中,另一列和左右表标识保存在value中,然后输出。reduce拿到连接结果之后,解析value内容,根据标志将左右表内容分开存放,然后求笛卡尔积,最后直接输出。
这个实例的具体分析参考单表关联实例。下面给出代码。
5.3 程序代码
程序代码如下所示:
package com.hebut.mr;
import java.io.IOException;
import java.util.*;
import org.apache.hadoop.conf.Configuration;
import org.apache.hadoop.fs.Path;
import org.apache.hadoop.io.IntWritable;
import org.apache.hadoop.io.Text;
import org.apache.hadoop.mapreduce.Job;
import org.apache.hadoop.mapreduce.Mapper;
import org.apache.hadoop.mapreduce.Reducer;
importorg.apache.hadoop.mapreduce.lib.input.FileInputFormat;
importorg.apache.hadoop.mapreduce.lib.output.FileOutputFormat;
import org.apache.hadoop.util.GenericOptionsParser;
public class MTjoin {
public static int time = 0;
/*
* 在map中先区分输入行属于左表还是右表,然后对两列值进行分割,
* 保存连接列在key值,剩余列和左右表标志在value中,最后输出
*/
public static class Map extends Mapper<Object, Text, Text, Text> {
// 实现map函数
public void map(Object key, Text value, Context context)
throws IOException, InterruptedException {
String line = value.toString();// 每行文件
String relationtype = new String();// 左右表标识
// 输入文件首行,不处理
if (line.contains(“factoryname”) == true
|| line.contains(“addressed”) ==true) {
return;
}
// 输入的一行预处理文本
StringTokenizer itr = newStringTokenizer(line);
String mapkey = new String();
String mapvalue = new String();
int i = 0;
while (itr.hasMoreTokens()) {
// 先读取一个单词
String token = itr.nextToken();
// 判断该地址ID就把存到”values[0]”
if (token.charAt(0) >= ’0′ && token.charAt(0) <= ’9′) {
mapkey = token;
if (i > 0) {
relationtype = ”1″;
} else {
relationtype = ”2″;
}
continue;
}
// 存工厂名
mapvalue += token + ” “;
i++;
}
// 输出左右表
context.write(new Text(mapkey), newText(relationtype + ”+”+ mapvalue));
}
}
/*
* reduce解析map输出,将value中数据按照左右表分别保存,
* 然后求出笛卡尔积,并输出。
*/
public static class Reduce extends Reducer<Text, Text, Text, Text> {
// 实现reduce函数
public void reduce(Text key, Iterable<Text> values, Context context)
throws IOException, InterruptedException {
// 输出表头
if (0 == time) {
context.write(new Text(“factoryname”), newText(“addressname”));
time++;
}
int factorynum = 0;
String[] factory = new String[10];
int addressnum = 0;
String[] address = new String[10];
Iterator ite = values.iterator();
while (ite.hasNext()) {
String record = ite.next().toString();
int len = record.length();
int i = 2;
if (0 == len) {
continue;
}
// 取得左右表标识
char relationtype = record.charAt(0);
// 左表
if (’1′ == relationtype) {
factory[factorynum] = record.substring(i);
factorynum++;
}
// 右表
if (’2′ == relationtype) {
address[addressnum] = record.substring(i);
addressnum++;
}
}
// 求笛卡尔积
if (0 != factorynum && 0 != addressnum) {
for (int m = 0; m < factorynum; m++) {
for (int n = 0; n < addressnum; n++) {
// 输出结果
context.write(newText(factory[m]),
new Text(address[n]));
}
}
}
}
}
public static void main(String[] args) throwsException {
Configuration conf = new Configuration();
// 这句话很关键
conf.set(“mapred.job.tracker”,”192.168.1.2:9001″);
String[] ioArgs = new String[] { ”MTjoin_in”,”MTjoin_out” };
String[] otherArgs = newGenericOptionsParser(conf, ioArgs).getRemainingArgs();
if (otherArgs.length != 2) {
System.err.println(“Usage: Multiple Table Join <in> <out>”);
System.exit(2);
}
Job job = new Job(conf, ”Multiple Table Join”);
job.setJarByClass(MTjoin.class);
// 设置Map和Reduce处理类
job.setMapperClass(Map.class);
job.setReducerClass(Reduce.class);
// 设置输出类型
job.setOutputKeyClass(Text.class);
job.setOutputValueClass(Text.class);
// 设置输入和输出目录
FileInputFormat.addInputPath(job, newPath(otherArgs[0]));
FileOutputFormat.setOutputPath(job, newPath(otherArgs[1]));
System.exit(job.waitForCompletion(true) ? 0 : 1);
}
}
5.4 代码结果
1)准备测试数据
通过Eclipse下面的”DFS Locations”在”/user/hadoop”目录下创建输入文件”MTjoin_in”文件夹(备注:”MTjoin_out”不需要创建。)如图5.4-1所示,已经成功创建。
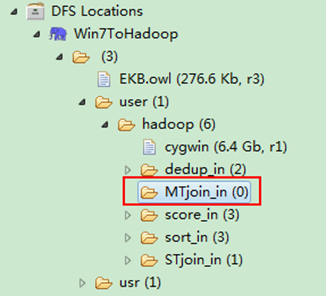
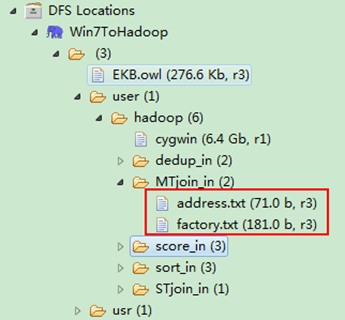
图5.4-1 创建”MTjoin_in” 图5.4.2 上传两个数据表
然后在本地建立两个txt文件,通过Eclipse上传到”/user/hadoop/MTjoin_in”文件夹中,两个txt文件的内容如”实例描述”那两个文件一样。如图5.4-2所示,成功上传之后。
从SecureCRT远处查看”Master.Hadoop”的也能证实我们上传的两个文件。
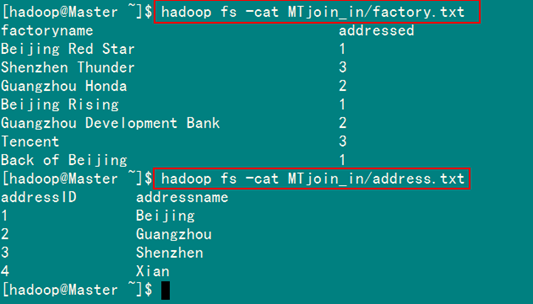
图5.4.3 两个数据表的内容
2)查看运行结果
这时我们右击Eclipse 的”DFS Locations”中”/user/hadoop”文件夹进行刷新,这时会发现多出一个”MTjoin_out”文件夹,且里面有3个文件,然后打开双 其”part-r-00000″文件,会在Eclipse中间把内容显示出来。如图5.4-4所示。
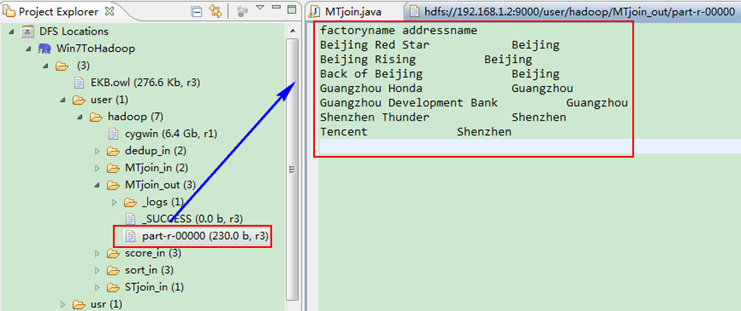
图5.4-4 运行结果
6、倒排索引
“倒排索引“是文档检索系统中最常用的数据结构,被广泛地应用于全文搜索引擎。它主要是用来存储某个单词(或词组)在一个文档或一组文档中的存储位置的映射,即提供了一种根据内容来查找文档的方式。由于不是根据文档来确定文档所包含的内容,而是进行相反的操作,因而称为倒排索引(Inverted Index)。
6.1 实例描述
通常情况下,倒排索引由一个单词(或词组)以及相关的文档列表组成,文档列表中的文档或者是标识文档的ID号,或者是指文档所在位置的URL,如图6.1-1所示。
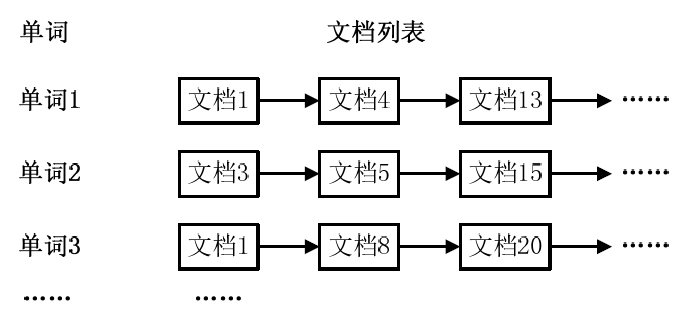
图6.1-1 倒排索引结构
从图6.1-1可以看出,单词1出现在{文档1,文档4,文档13,……}中,单词2出现在{文档3,文档5,文档15,……}中,而单词3出现在{文档1,文档8,文档20,……}中。在实际应用中,还需要给每个文档添加一个权值,用来指出每个文档与搜索内容的相关度,如图6.1-2所示。
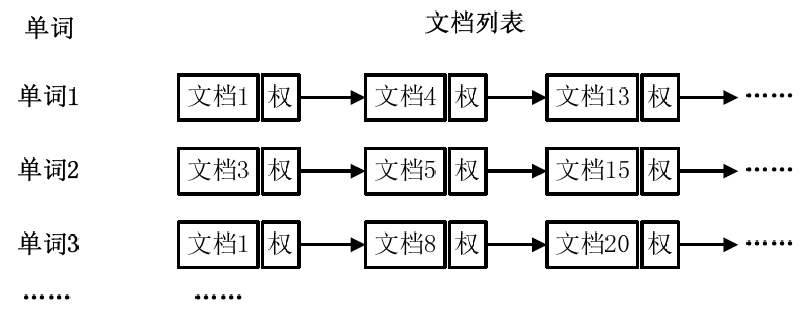
图6.1-2 添加权重的倒排索引
最常用的是使用词频作为权重, 即记录单词在文档中出现的次数。以英文为例,如图6.1-3所示,索引文件中的”MapReduce”一行表示:”MapReduce”这个单词在文本 T0中出现过1次,T1中出现过1次,T2中出现过2次。当搜索条件为”MapReduce”、”is”、”Simple”时,对应的集合为: {T0,T1,T2}∩{T0,T1}∩{T0,T1}={T0,T1},即文档T0和T1包含了所要索引的单词,而且只有T0是连续的。
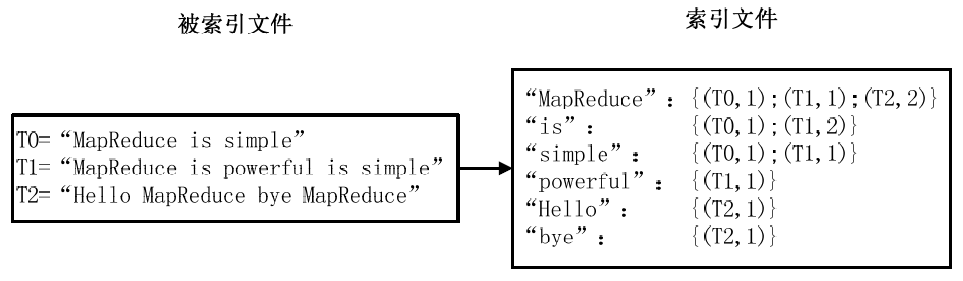
图6.1-3 倒排索引示例
更复杂的权重还可能要记录单词在多少个文档中出现过,以实现TF-IDF(Term Frequency-Inverse Document Frequency)算法,或者考虑单词在文档中的位置信息(单词是否出现在标题中,反映了单词在文档中的重要性)等。
样例输入如下所示。
1)file1:
MapReduce is simple
2)file2:
MapReduce is powerful is simple
3)file3:
Hello MapReduce bye MapReduce
样例输出如下所示。
MapReduce file1.txt:1;file2.txt:1;file3.txt:2;
is file1.txt:1;file2.txt:2;
simple file1.txt:1;file2.txt:1;
powerful file2.txt:1;
Hello file3.txt:1;
bye file3.txt:1;
6.2 设计思路
实现”倒排索引“只要关注的信息为:单词、文档URL及词频,如图3-11所示。但是在实现过程中,索引文件的格式与图6.1-3会略有所不同,以避免重写OutPutFormat类。下面根据MapReduce的处理过程给出倒排索引的设计思路。
1)Map过程
首先使用默认的TextInputFormat类对输入文件进行处理,得到文本中每行的偏移量及其内容。显然,Map过程首先必须分析输入的<key,value>对,得到倒排索引中需要的三个信息:单词、文档URL和词频,如图6.2-1所示。

图6.2-1 Map过程输入/输出
这里存在两个问题:第一,<key,value>对只能有两个值,在不使用Hadoop自定义数据类型的情况下,需要根据情况将其中两个值合并成一个值,作为key或value值;第二,通过一个Reduce过程无法同时完成词频统计和生成文档列表,所以必须增加一个Combine过程完成词频统计。
这里讲单词和URL组成key值(如”MapReduce:file1.txt”),将词频作为value,这样做的好处是可以利用MapReduce框架自带的Map端排序,将同一文档的相同单词的词频组成列表,传递给Combine过程,实现类似于WordCount的功能。
2)Combine过程
经过map方法处理后,Combine过程将key值相同的value值累加,得到一个单词在文档在文档中的词频,如图6.2-2所示。如果直接将图6.2-2所示的输出作为Reduce过程的输入,在Shuffle过程时将面临一个问题:所有具有相同单词的记录(由单词、URL和词频组成)应该交由同一个Reducer处理,但当前的key值无法保证这一点,所以必须修改key值和value值。这次将单词作为key值,URL和词频组成value值(如”file1.txt:1″)。这样做的好处是可以利用MapReduce框架默认的HashPartitioner类完成Shuffle过程,将相同单词的所有记录发送给同一个Reducer进行处理。
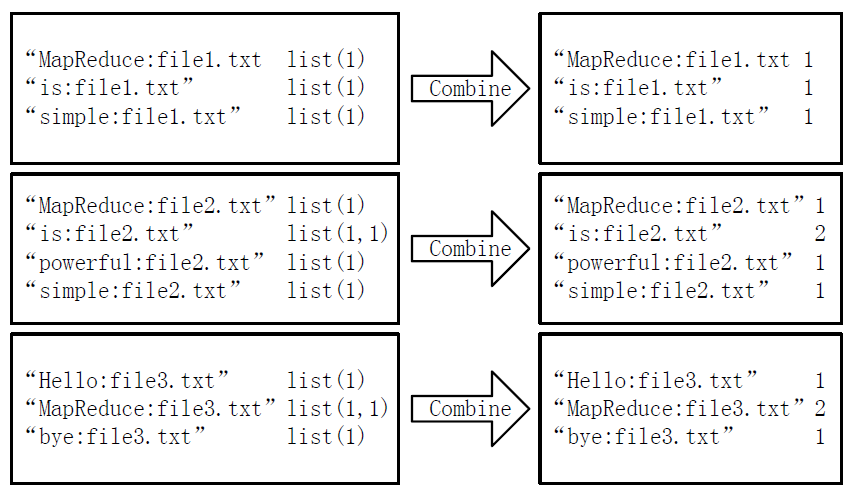
图6.2-2 Combine过程输入/输出
3)Reduce过程
经过上述两个过程后,Reduce过程只需将相同key值的value值组合成倒排索引文件所需的格式即可,剩下的事情就可以直接交给MapReduce框架进行处理了。如图6.2-3所示。索引文件的内容除分隔符外与图6.1-3解释相同。
4)需要解决的问题
本实例设计的倒排索引在文件数目上没有限制,但是单词文件不宜过大(具体值与默认HDFS块大小及相关配置有关),要保证每个文件对应一个split。否则,由于Reduce过程没有进一步统计词频,最终结果可能会出现词频未统计完全的单词。可以通过重写InputFormat类将每个文件为一个split,避免上述情况。或者执行两次MapReduce,第一次MapReduce用于统计词频,第二次MapReduce用于生成倒排索引。除此之外,还可以利用复合键值对等实现包含更多信息的倒排索引。
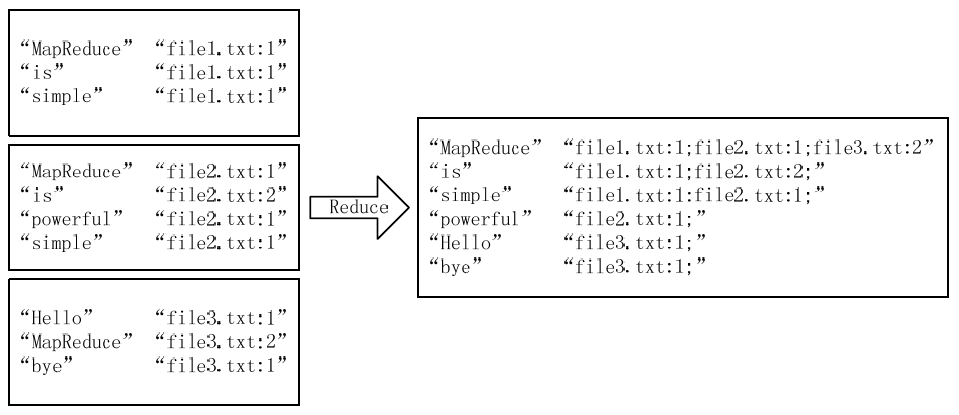
图6.2-3 Reduce过程输入/输出
6.3 程序代码
程序代码如下所示:
package com.hebut.mr;
import java.io.IOException;
import java.util.StringTokenizer;
import org.apache.hadoop.conf.Configuration;
import org.apache.hadoop.fs.Path;
import org.apache.hadoop.io.IntWritable;
import org.apache.hadoop.io.Text;
import org.apache.hadoop.mapreduce.Job;
import org.apache.hadoop.mapreduce.Mapper;
import org.apache.hadoop.mapreduce.Reducer;
importorg.apache.hadoop.mapreduce.lib.input.FileInputFormat;
import org.apache.hadoop.mapreduce.lib.input.FileSplit;
importorg.apache.hadoop.mapreduce.lib.output.FileOutputFormat;
import org.apache.hadoop.util.GenericOptionsParser;
public class InvertedIndex {
public static class Map extends Mapper<Object, Text, Text, Text> {
private Text keyInfo = new Text(); // 存储单词和URL组合
private Text valueInfo = new Text(); // 存储词频
private FileSplit split; // 存储Split对象
// 实现map函数
public void map(Object key, Text value, Context context)
throws IOException, InterruptedException {
// 获得<key,value>对所属的FileSplit对象
split = (FileSplit) context.getInputSplit();
StringTokenizer itr = newStringTokenizer(value.toString());
while (itr.hasMoreTokens()) {
// key值由单词和URL组成,如”MapReduce:file1.txt”
// 获取文件的完整路径
//keyInfo.set(itr.nextToken()+”:”+split.getPath().toString());
// 这里为了好看,只获取文件的名称。
int splitIndex =split.getPath().toString().indexOf(“file”);
keyInfo.set(itr.nextToken() + ”:”
+split.getPath().toString().substring(splitIndex));
// 词频初始化为1
valueInfo.set(“1″);
context.write(keyInfo, valueInfo);
}
}
}
public static class Combine extends Reducer<Text, Text, Text, Text> {
private Text info = new Text();
// 实现reduce函数
public void reduce(Text key, Iterable<Text> values, Context context)
throws IOException, InterruptedException {
// 统计词频
int sum = 0;
for (Text value : values) {
sum += Integer.parseInt(value.toString());
}
int splitIndex = key.toString().indexOf(“:”);
// 重新设置value值由URL和词频组成
info.set(key.toString().substring(splitIndex + 1) + ”:” + sum);
// 重新设置key值为单词
key.set(key.toString().substring(0, splitIndex));
context.write(key, info);
}
}
public static class Reduce extends Reducer<Text, Text, Text, Text> {
private Text result = new Text();
// 实现reduce函数
public void reduce(Text key, Iterable<Text> values, Context context)
throws IOException, InterruptedException {
// 生成文档列表
String fileList = new String();
for (Text value : values) {
fileList += value.toString() + ”;”;
}
result.set(fileList);
context.write(key, result);
}
}
public static void main(String[] args) throwsException {
Configuration conf = new Configuration();
// 这句话很关键
conf.set(“mapred.job.tracker”,”192.168.1.2:9001″);
String[] ioArgs = new String[] { ”index_in”,”index_out” };
String[] otherArgs = newGenericOptionsParser(conf, ioArgs)
.getRemainingArgs();
if (otherArgs.length != 2) {
System.err.println(“Usage: Inverted Index <in> <out>”);
System.exit(2);
}
Job job = new Job(conf, ”Inverted Index”);
job.setJarByClass(InvertedIndex.class);
// 设置Map、Combine和Reduce处理类
job.setMapperClass(Map.class);
job.setCombinerClass(Combine.class);
job.setReducerClass(Reduce.class);
// 设置Map输出类型
job.setMapOutputKeyClass(Text.class);
job.setMapOutputValueClass(Text.class);
// 设置Reduce输出类型
job.setOutputKeyClass(Text.class);
job.setOutputValueClass(Text.class);
// 设置输入和输出目录
FileInputFormat.addInputPath(job, newPath(otherArgs[0]));
FileOutputFormat.setOutputPath(job, newPath(otherArgs[1]));
System.exit(job.waitForCompletion(true) ? 0 : 1);
}
}
6.4 代码结果
1)准备测试数据
通过Eclipse下面的”DFS Locations”在”/user/hadoop”目录下创建输入文件”index_in”文件夹(备注:”index_out”不需要创建。)如图6.4-1所示,已经成功创建。
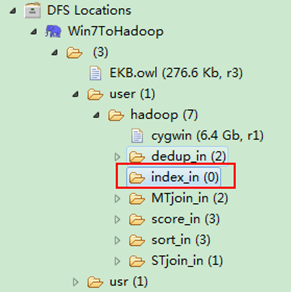
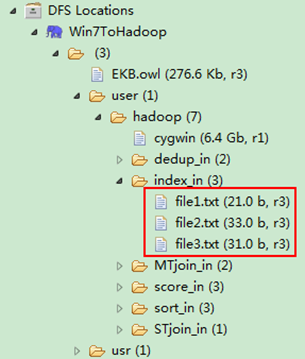
图6.4-1 创建”index_in” 图6.4.2 上传”file*.txt”
然后在本地建立三个txt文件,通过Eclipse上传到”/user/hadoop/index_in”文件夹中,三个txt文件的内容如”实例描述”那三个文件一样。如图6.4-2所示,成功上传之后。
从SecureCRT远处查看”Master.Hadoop”的也能证实我们上传的三个文件。
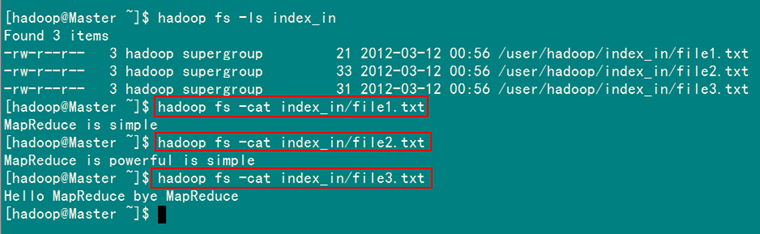
图6.4.3 三个”file*.txt”的内容
2)查看运行结果
这时我们右击Eclipse 的”DFS Locations”中”/user/hadoop”文件夹进行刷新,这时会发现多出一个”index_out”文件夹,且里面有3个文件,然后打开双 其”part-r-00000″文件,会在Eclipse中间把内容显示出来。如图6.4-4所示。

图6.4-4 运行结果
文章下载地址:http://files.cnblogs.com/xia520pi/HadoopCluster_Vol.9.rar
本文版权归作者和博客园共有,欢迎转载,但未经作者同意必须保留此段声明,且在文章页面明显位置给出原文连接,否则保留追究法律责任的权利。
http://www.cnblogs.com/xia520pi/archive/2012/06/04/2534533.html